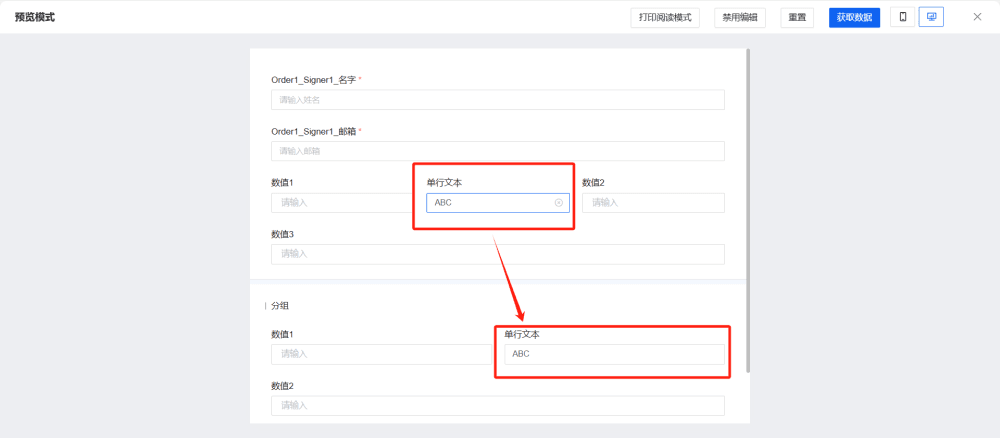
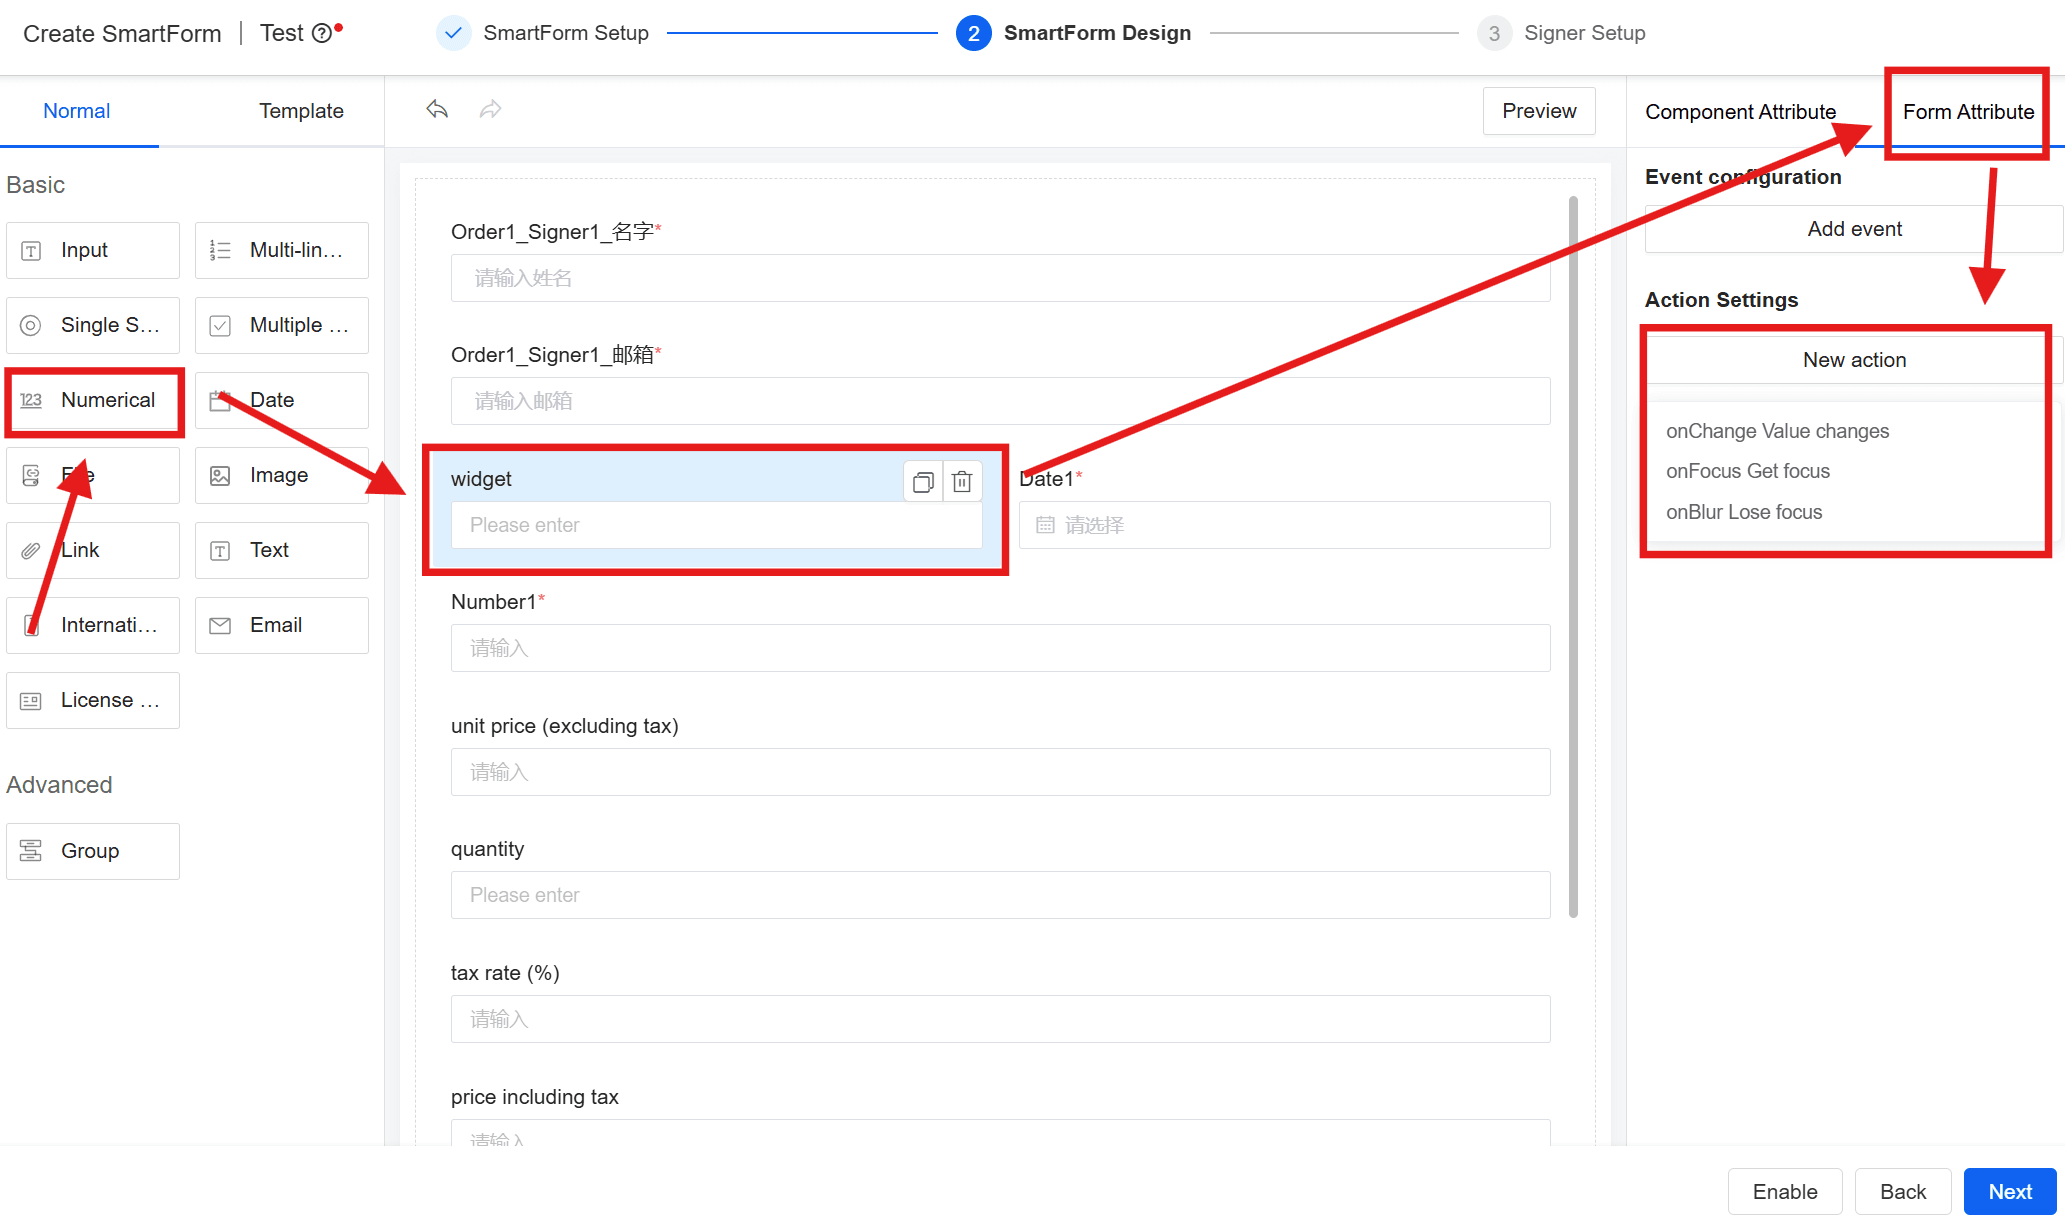
eSignGlobal supports Form Attribute configuration for custom fields when creating SmartForms:
Using the [Event configuration] function, you can perform real-time simple formula calculations on the input values of multiple information collection fields, and the calculation results will be automatically displayed in the target fields;
- With the [Action Settings] function, when an action task occurs in the form fields, call the generator, such as performing custom complex calculations and assigning values to the appropriate fields, using JavaScript to implement your own business logic.
Event configuration
Function Introduction
The input values of multiple information collection fields are calculated in real time by formula calculation, and the calculation results are automatically displayed on the target fields. This function implements fields binding and responsive update through visual formulas, and can complete complex business logic calculation without writing code.

Note:
- The [Event configuration] function currently only supports +,-,*,/
Application Situations
It is applicable to situations that require real-time display after simple calculation, such:
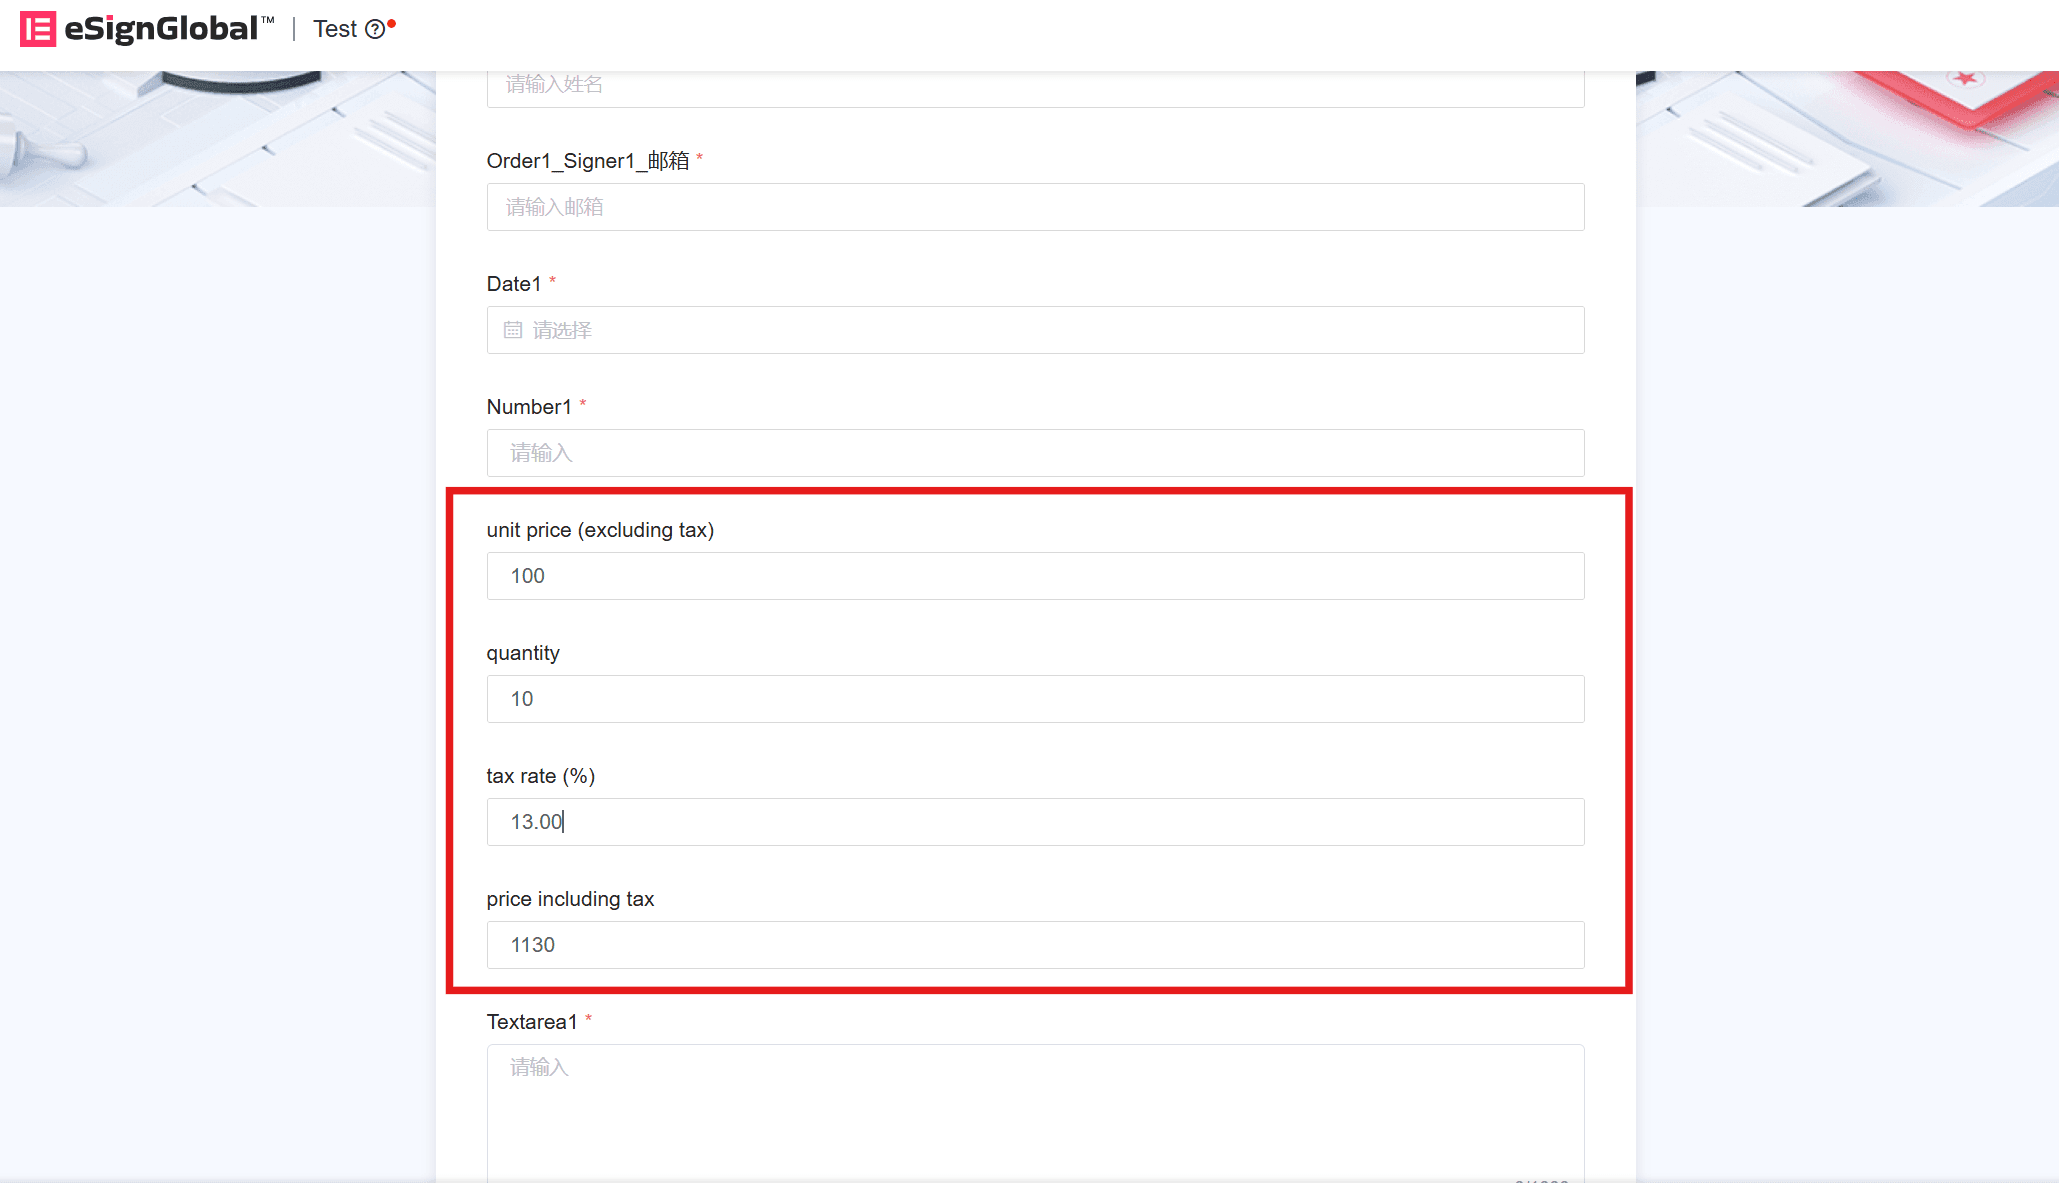
- Calculate the total price including tax in real time in the purchase order form: (unit price * quantity) * (1 + tax rate/100)
- Dynamic calculation of equipment operating efficiency: (Current * voltage * operating Time)/1000
How to Use
Take the real-time calculation of the total price including tax for a purchase order as an example:
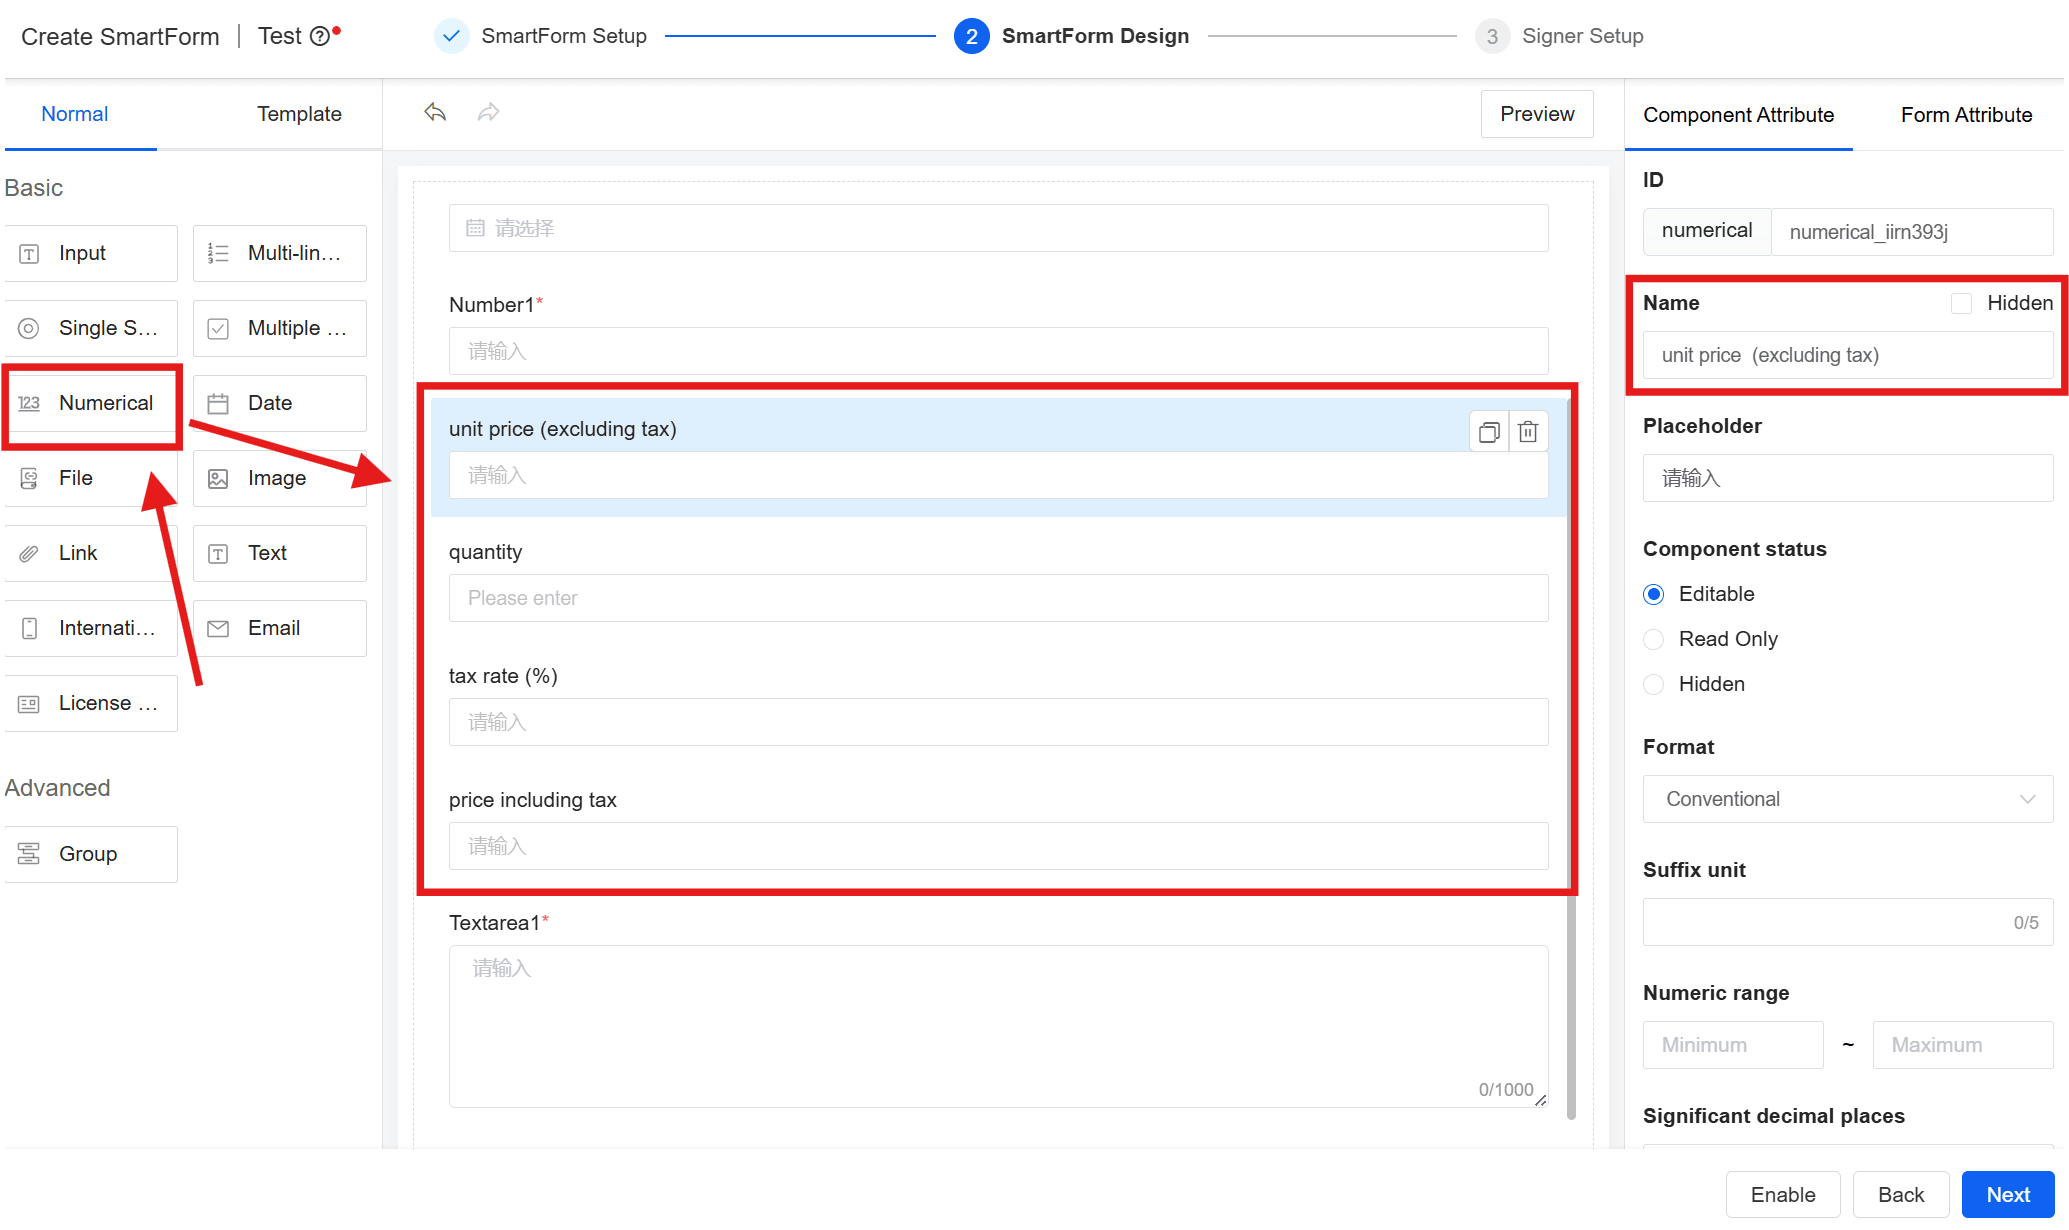
- Drag four numeric fields into the form: unit price, quantity, tax rate, and price including tax.
Note:
- Calculated functions are only available for numeric fields.
- If you add a text field, only the "+" function is supported for string concatenation. In this case, the Target field type must also be a text field.
- Add an event in [From Attribute] > [Event configuration] in the configuration panel of the [Unit Price] field.
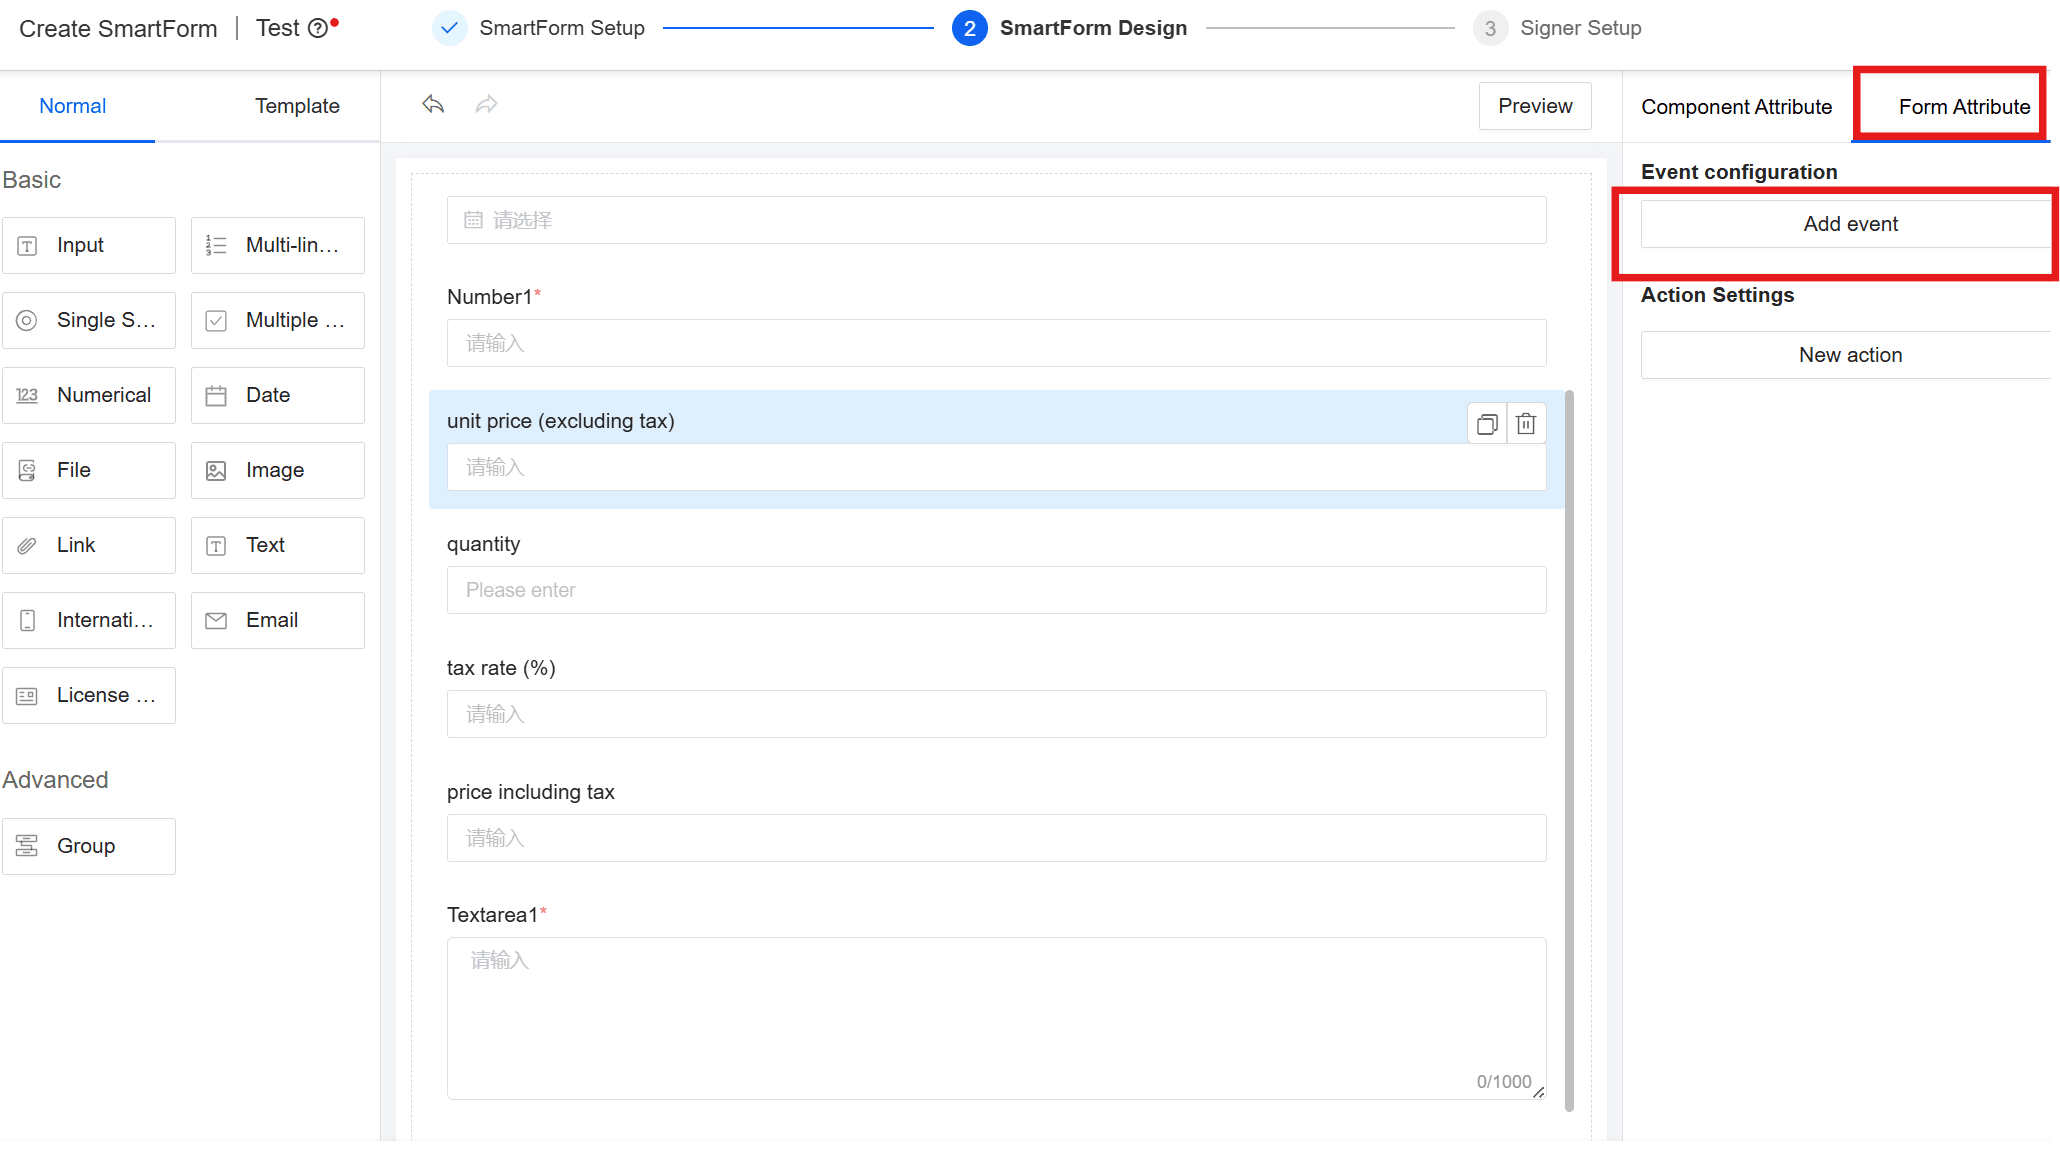
- In [Event configuration], configure the function to be triggered when [Trigger type] is [Field changes].
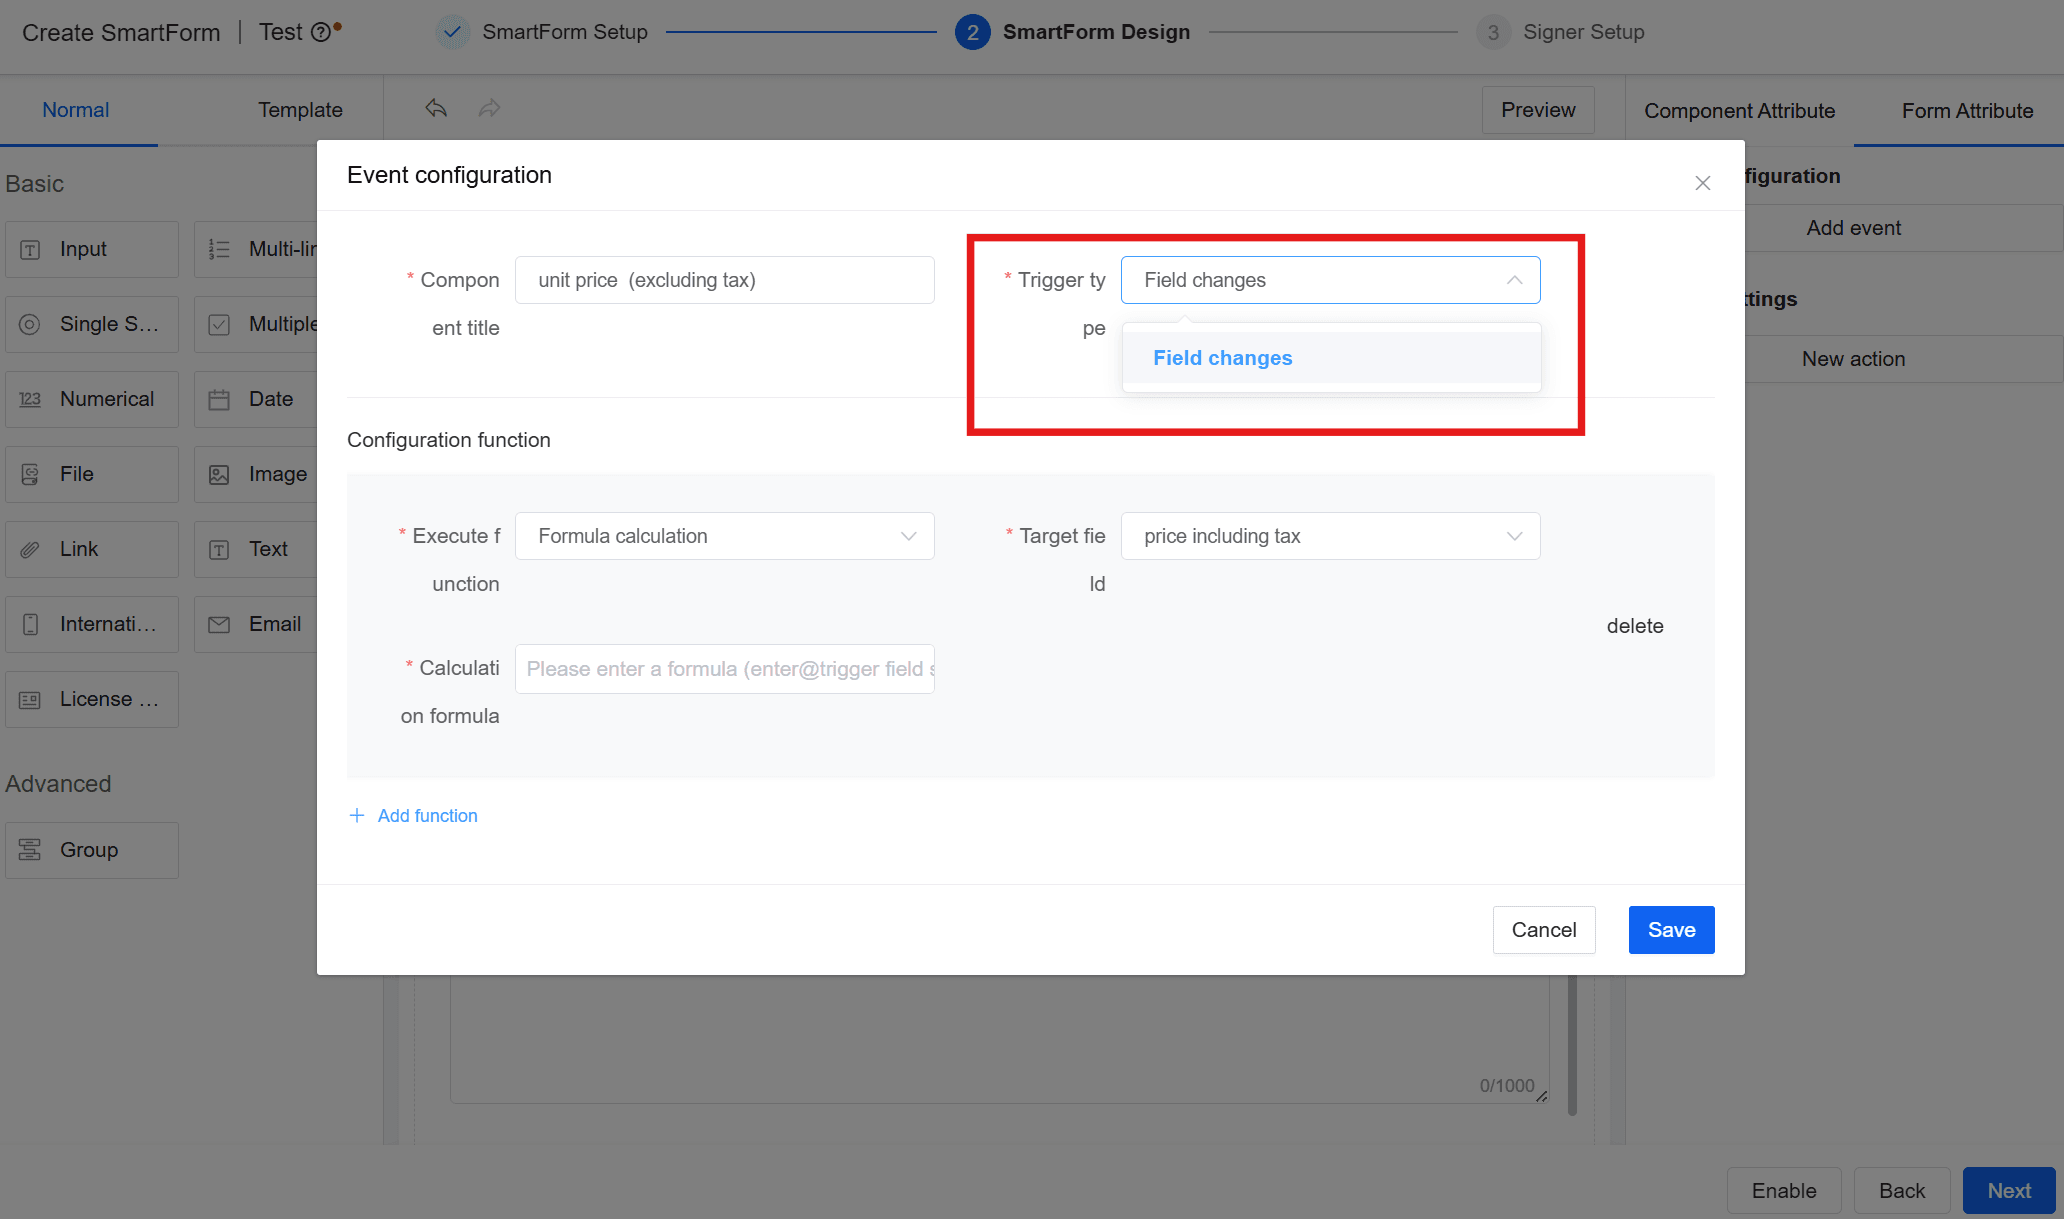
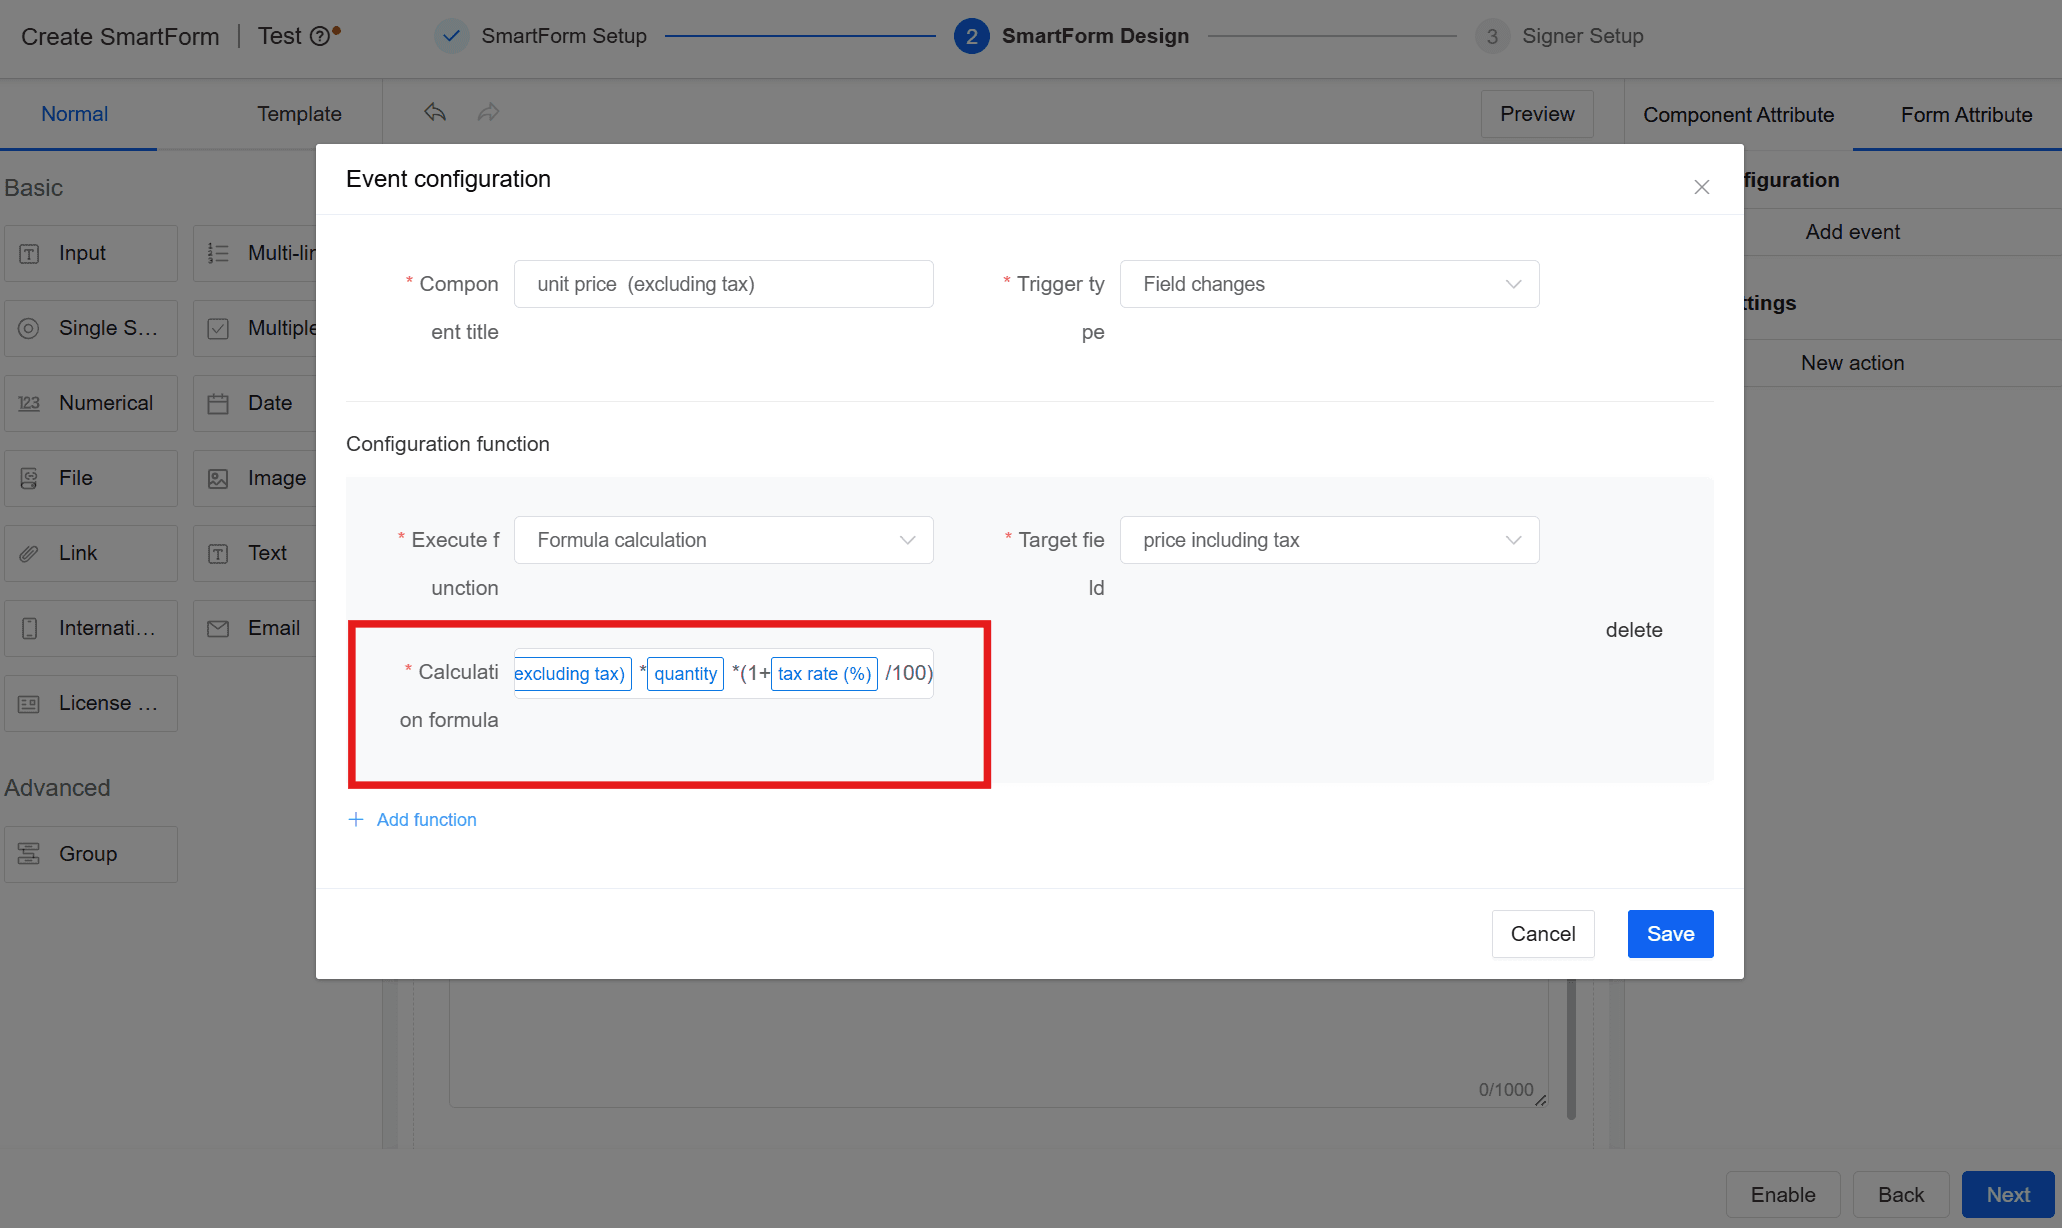
- Edit calculation formula: Enter "@" + field name to add fields you want to calculate;
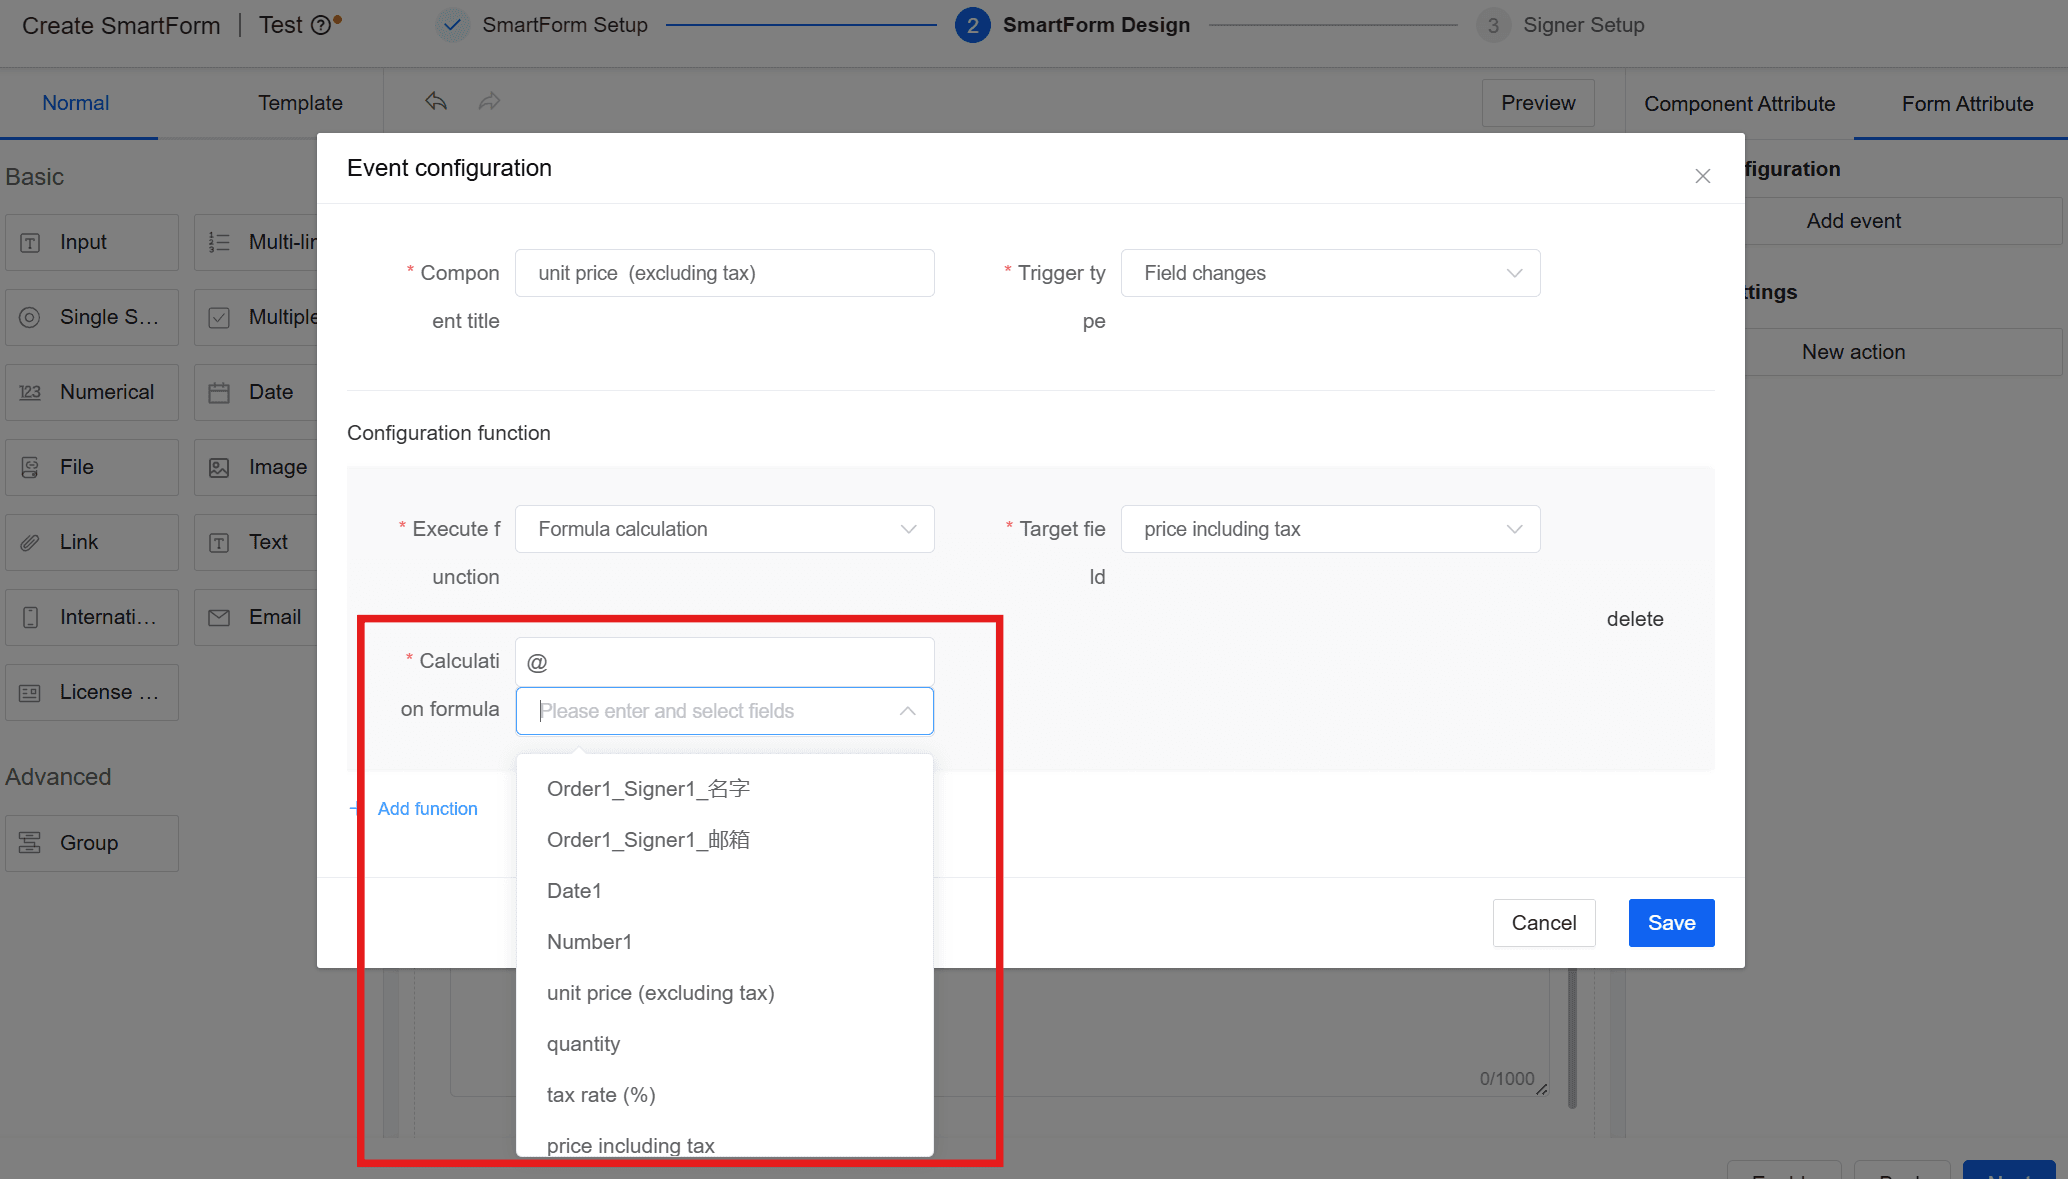
Write a formula as needed, such as: (unit price * quantity) *(1 + tax rate/100).
Warning:
- When using brackets, please use English brackets "()".
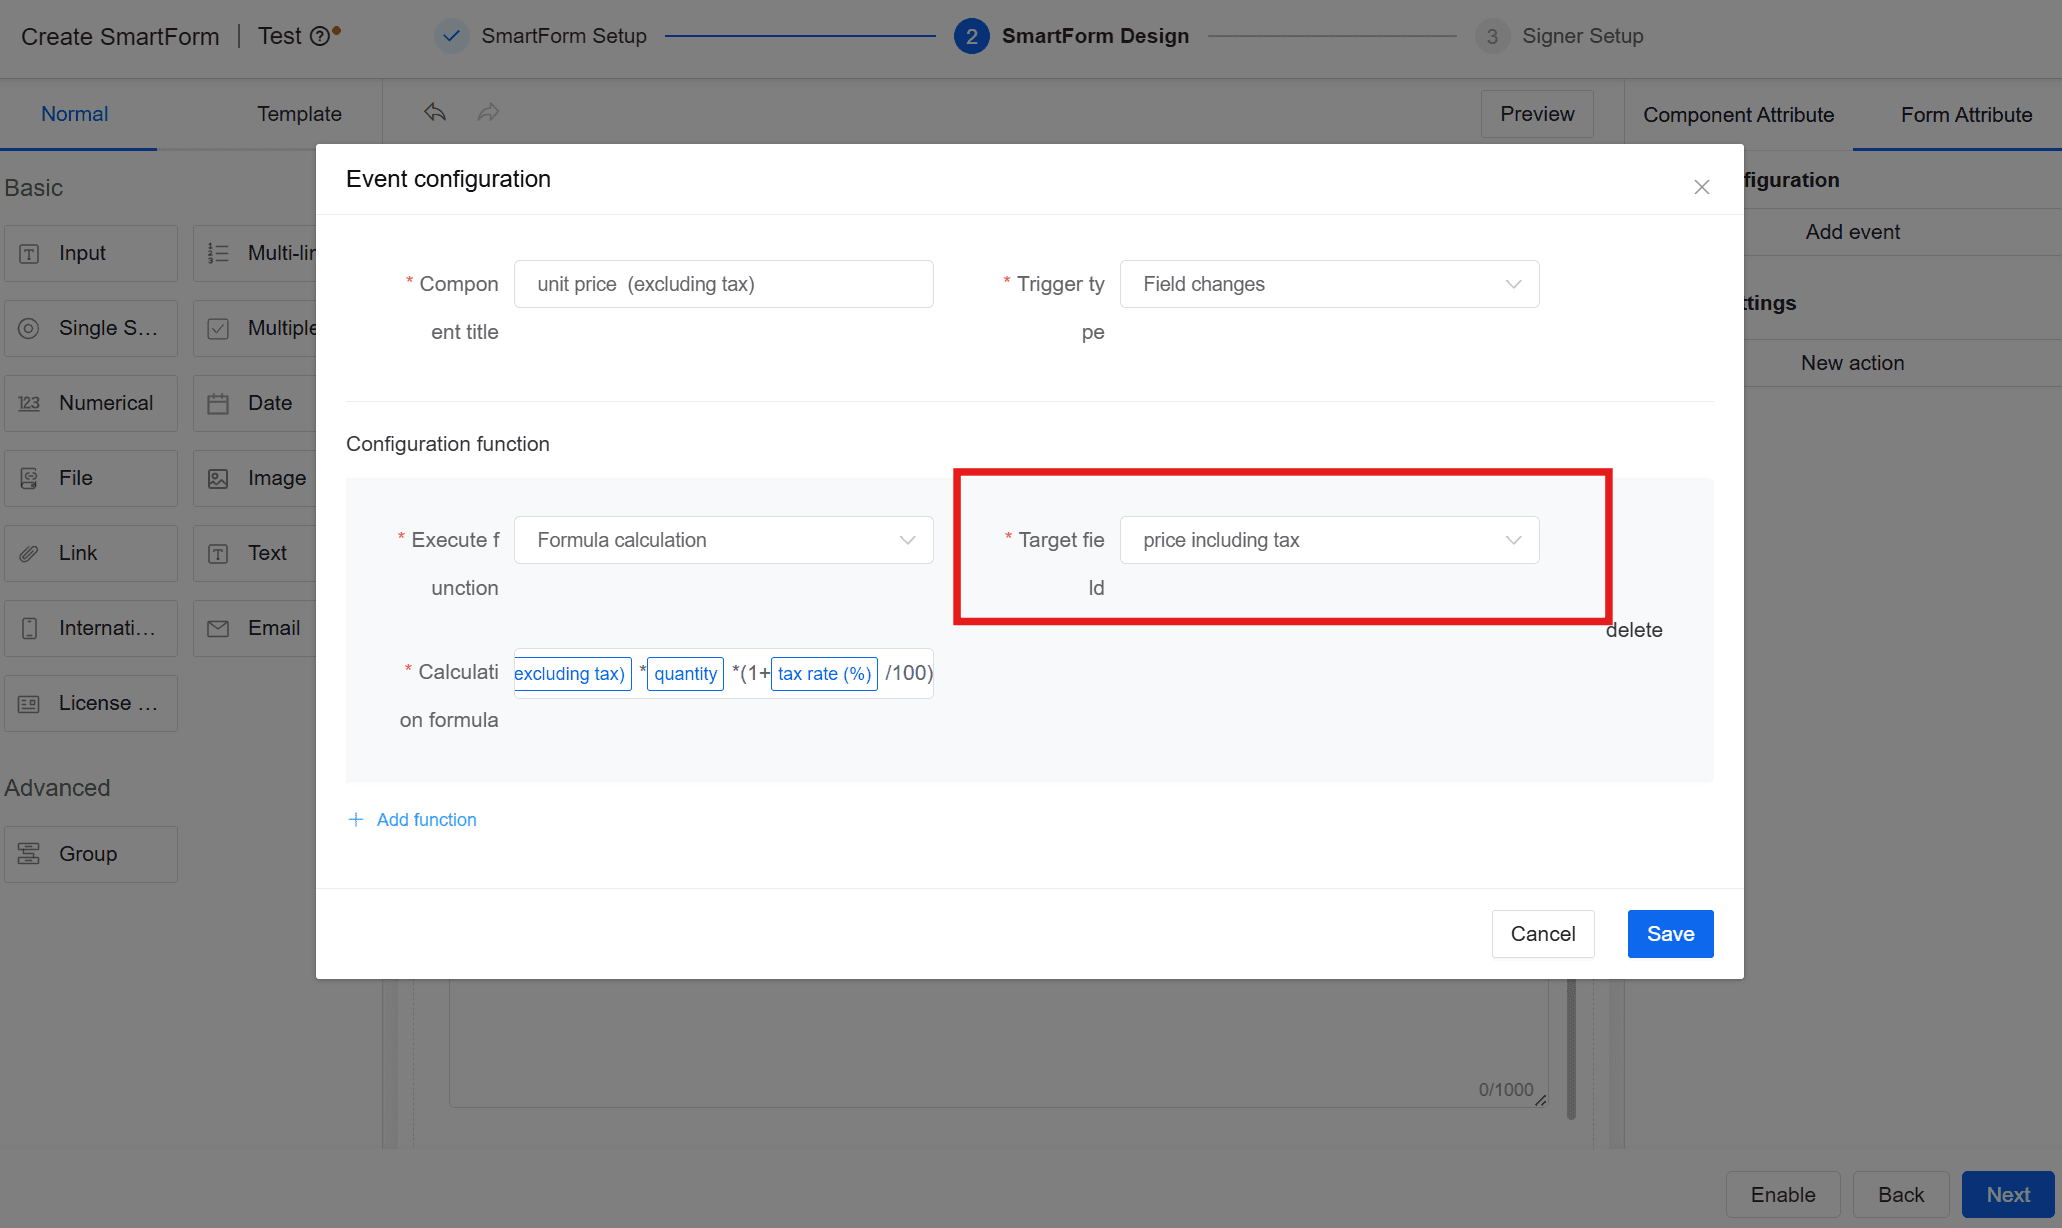
- For [Target Field], select a field to display the calculation result. We will force the type of the field involved in the calculation based on the data type of the Target field.
Warning:
- The Target field type must be the same as the field type participating in the calculation.
- All fields that participate in the calculation need to be configured to recalculate when the value of each field that participates in the calculation changes. For example, in this situation, [unit price], [quantity] and [tax rate] must be configured for this event.
Warning:
- [Target field] does not need to be configured.
- After the configuration is complete, save the SmartForm.
Action Settings
Function Introduction
Users can write javascript code in [Form Attribute]> [Action Settings] to implement their own business logic.
Application Situations
Complex field value calculations that cannot be done by simple formula calculations. For example, convert the content of a single line of text input into a number, and then set it to one or more other fields after calculation by custom calculation rules;
- The method of the generator is called when an action occurs in the form field.
How to Use
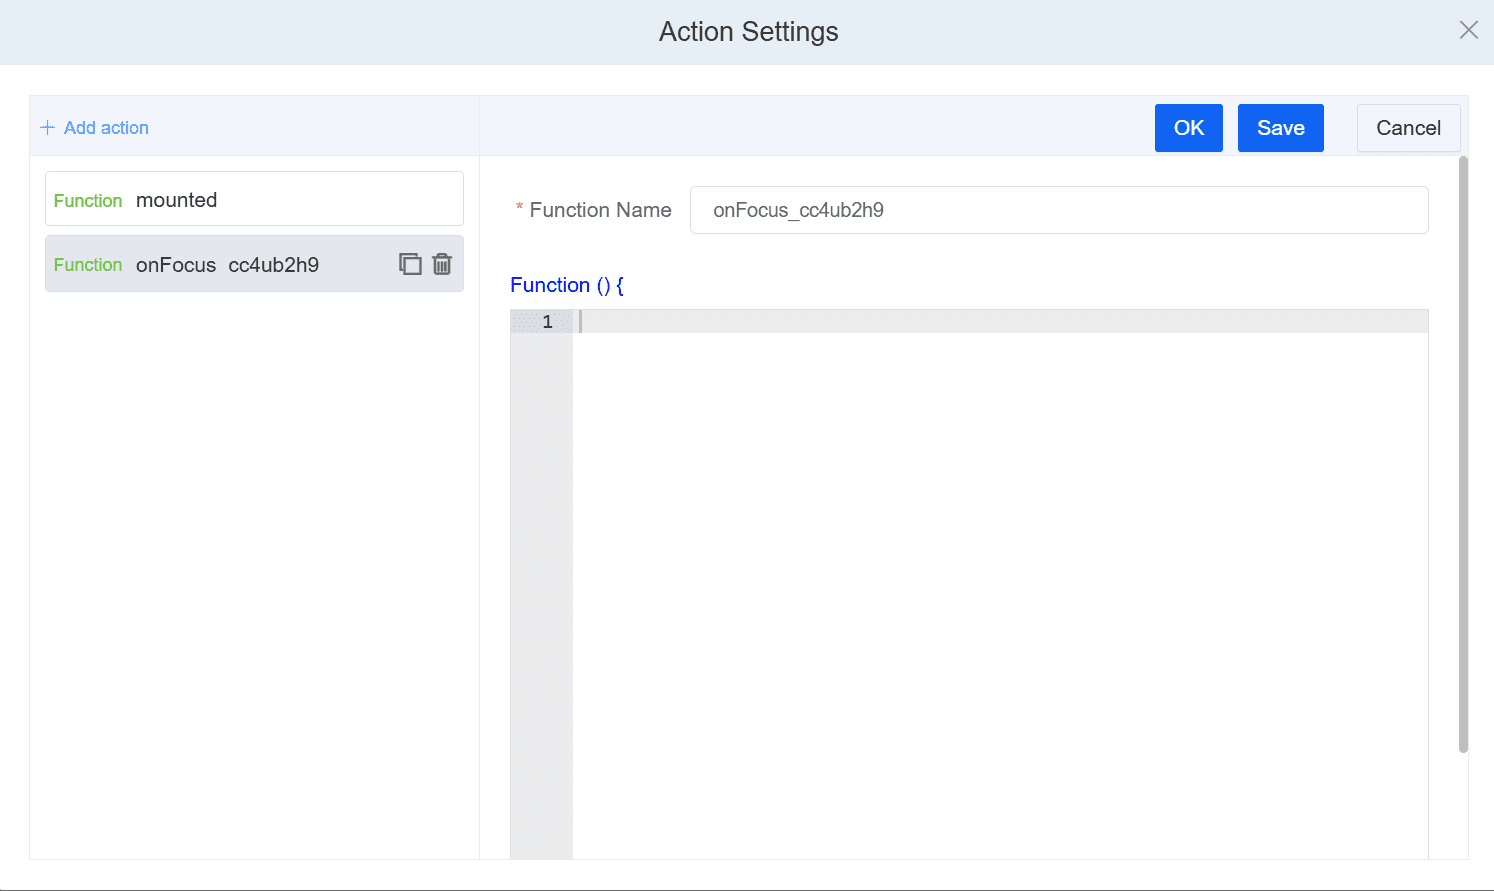
1. Open js edit panel
- Select fields;
- Click [Form Attribute] to switch to the corresponding panel;
- Click [Action Settings]> [New action];
- Select the corresponding action from the drop-down menu that appears. When the corresponding action is triggered, the JS code you wrote will be executed. Currently, the following four actions are supported:
- mounted, after field loading
- onBlur, when the field is out of focus
- onChange, when the field value changes
- onFocus, when the field is selected
Note:
- To set [mounted], first select one of the remaining three states, click [Save] in the upper right corner of the jump page, and then select [mounted] on the left.
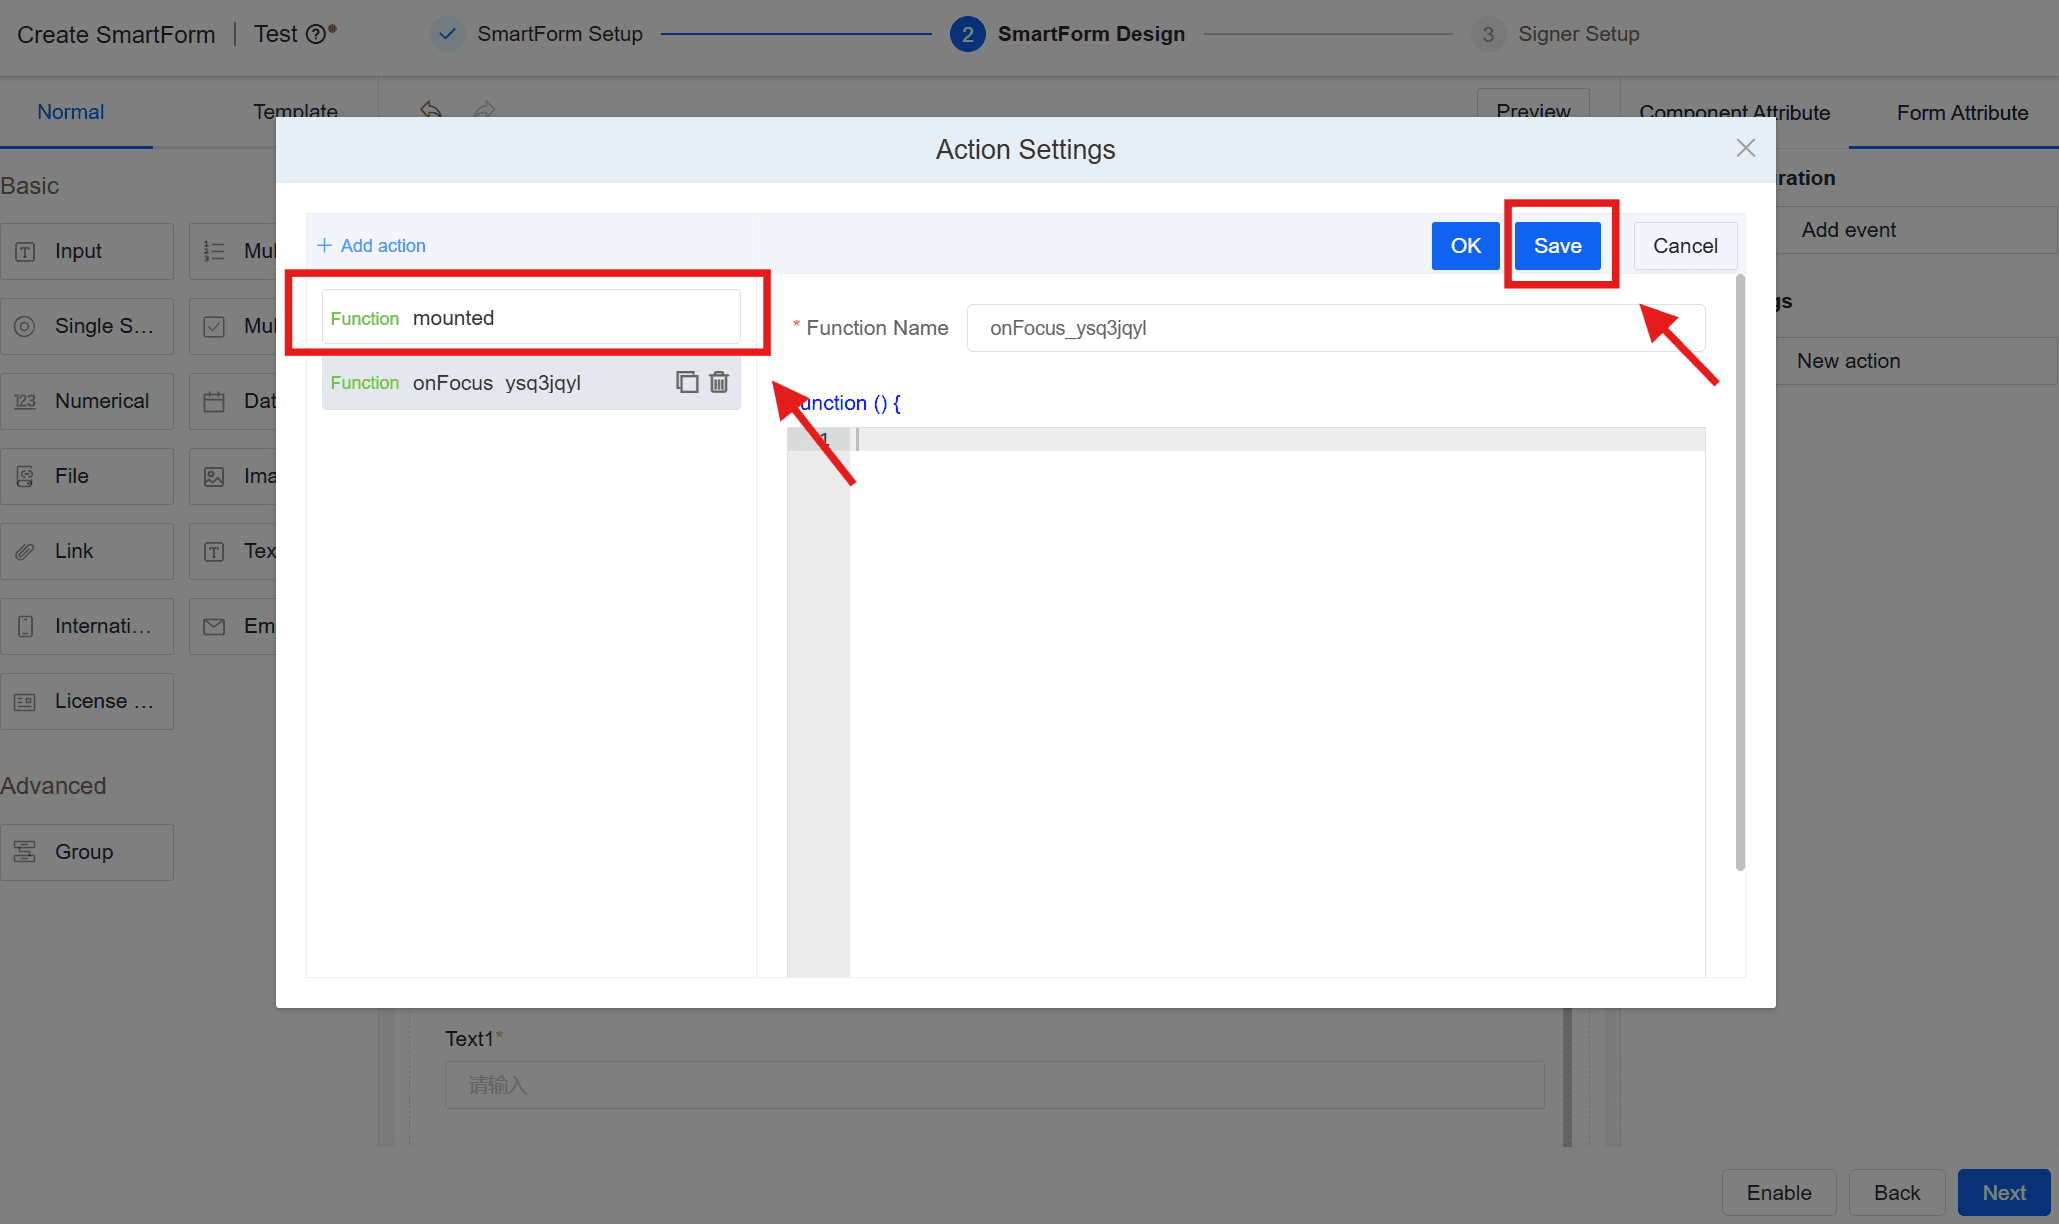
- Write code in the js editing panel. In addition to writing regular code, in the next chapter, we will teach you how to enter and exit parameters and currently supported functions. The js panel preview is as follows:
2. Event Parameter Acquisition
When you need to enter parameters, for example, when passing the values of other fields into the code for processing, write as follows:
function () {
this.models[fieldKey]
//Example: this.models[' input_yi7bli17 ']
}
2.1. Get current field properties
In the event function, you can obtain the attribute value through arguments[0], as follows:
function () {
const { field} = arguments[0]
}
However, in different actions, the field attributes that can be obtained are also different. For details, see below:
2.1.1. onBlur
The fieldKey of the field can be obtained. The fieldKey is of the string type. For example:
function () {
// Indicates to get the value of the current component
const { field } = arguments[0]
this.models['input_pr13o8wi']=field
}
2.1.2. onChange
The fieldKey and value of the field can be obtained. Their data types are {field: string, value: any}
Property Meaning:
- field: Field key
- value: Field value
2.1.3. onFocus
The same as onBlur.
2.2. Function [this] Details
In addition to getting field properties, we also support getting properties of other fields. In the action function, this points to the GenerateForm instance, that is, you can directly call the method in GenerateForm. It is emphasized here that in this function, substituting the field key can obtain its value or write the value into the corresponding fieldKey, such as:this.models['fieldKey']
function () {
// Get form values
this.getData()
// Set the value of a form field
this.models['id'] = 'new value'
// Trigger a written function
this.triggerEvent('foo', { a: 123 })
// Show form hidden fields
this.display('id')
}
3. Write Code
After obtaining the desired property or value, you can write code directly, as follows:
const keyA = 'input_yi7bli17'const keyB = 'input_78qtmi79'const keyC = 'input_n8qwf66f'this.models[keyC] = this.models[keyA] + this.models[keyB]
3.1. Supported Functions
Use triggerEvent in a function to call a function:
function () {
this.triggerEvent('test', { id: '123' })
}
In the test method, you can get the parameters in the following ways:
function () {
const { id } = arguments[0]
}
4. Operation
Click the [preview] of the form to trigger the corresponding action to see the effect.
5. Example for Explanation
For example, obtain the value of the current field and assign it to another field. The Key of the other field is input_69m9x9mj.